Saturday, 25 October 2014

The Power of Kale: Juice to Victory!

Kale is having its moment. It has exploded in popularity recently; from the latest magazines filling column inches with its praise, to ‘fad’ diet plans dedicated to the stuff. It seems everyone is giving this vegetable a try. And why not? As part of the cabbage family, the list of benefits is endless. This green leafy vegetable is packed with iron, vitamins A, B, C and K, fibre, anti-oxidants and multiple minerals.

So, how’s best to eat this super food? Well, it seems the trend is to juice it, with celebrities everywhere being snapped with this healthy-looking green juice. But doesn’t it taste disgusting? Despite my best efforts, I’ve never been a big fan of vegetable juices, finding them fairly unpalatable when compared with the sweetness of a fruit juice.

Curiosity took over, and I set out to create a kale juice which tasted great and that I would enjoy drinking. After stocking up on a variety of fruit and vegetables (and plenty of kale), I was ready to give it a go. I spent the afternoon trying out various combinations, taking note of what tasted good together, and turning my kitchen into a bombsite in the process! I eventually honed it down to my two favourites, both of which contain plenty of fruit to help mask the taste of the kale. I used a blender to make mine, as I don’t have a juicer. It worked fine, but I used extra liquid in my recipes to ensure it reached the correct consistency. Don’t forget to drink it as soon as you can after making, since the ingredients will start to lose nutrients once blended.
Coconut and Pineapple Kale Juice

Blend together a bunch of kale with a cup of coconut water. It will look quite ‘bitty’ at this stage but don’t worry. Next add a 3 inch piece of cucumber, 1 stick of celery and 3 heaped tbsp. of fresh or tinned pineapple. Blend until smooth.
This juice is really refreshing, and the coconut water and pineapple keep it tasting lovely and sweet. I haven’t stopped drinking it since!

Kiwi and Ginger Kale Juice
This juice packs quite a punch with the tang of the kiwis and ginger! Perfect for the ‘morning after’, this juice rehydrates you and give you a shot of vitamins, whilst ginger helps to beat nausea. Ensure you use ripe kiwis to lessen the sharpness, and add the ginger a little at a time – increasing gradually to your taste.
Take a bunch of kale and 1 cored apple and blend with approx. 200-250ml water until smooth. Next add 2 ripe, peeled kiwis and blend again. Finally, add ½ thumbnail of ginger paste and blend to mix. A fantastic energiser in the morning!

Kale crisps are another trend that has appeared recently. With crisps being my weakness, I was keen to try making some of my own. And whilst you’re there, why not try making parsnip, carrot or beetroot crisps too? The perfect guilt-free snack, I guarantee they won’t last long!
Kale Crisps
Prepare the kale by washing the leaves, drying them thoroughly, then cutting out and discarding the thick stalks in the middle. Cut the leaves into bite sized pieces. Drizzle 1 tbsp. olive oil over the leaves and mix with your hands.

Lay the leaves out on a baking tray, ensuring they don’t overlap. This will take up a lot of space so you will need a few trays. Sprinkle with sea salt and cracked black pepper, then cook on a low heat (120⁰C) for 30 minutes. Leave to cool, before sprinkling with further sea salt and devouring!

 
Have a go at the recipes above or try out some of your own juices, and you will soon see what all the fuss is about with this super food. For me, it beats a can of coke and a packet of ready salted any day!

Look out for my next post soon!

Saturday, 18 October 2014

‘Santé!’: Cotton-reel Canapés to Coq au Vin Creation

I’ve just returned from a fortnight in the idyllic Languedoc Roussillon, Southern France. Driving through beautiful vineyards nestled in breath-taking mountains, and hopping from one picturesque town to the next along the coast, what better place to try all of the traditional delights and be inspired to start cooking!

Montpellier
Our first stop was the lively city of Montpellier, where we stumbled upon its local delicacy of Petit Pâtés. These delightful mini pies look like cute cotton reels, and are stuffed with minced mutton. They are a little similar to pork pies, except the filling is an unusual combination of sweet and savoury. I couldn’t wait to make some of own! They can be eaten hot or cold and would make a perfect addition to picnics. But since we are now in autumn, try them as a warming lunch with fresh salad, as delicious canapés or as a starter ‘with a difference’ at your next dinner party. Likewise, they are just at home on a cheese board, accompanied by a bottle of red wine.
 

There are many variations of this recipe to be found, some of which include sultanas and spices such as nutmeg. However, I wanted to keep them as a savoury pie with a sweet twist, rather than like a Christmas mince pie. Here’s my  recipe:
Petit Pâtés

1.      Combine 400g mutton/lamb mince with the zest of 1 lemon, 2 tbsp. brown sugar and a pinch of salt and pepper.

2.      Make (or buy!) some shortcrust pastry and start constructing your mini pie. Use a glass approx. 5cm diameter to cut out 2 disc ends. Cut a rectangle approx. 13.5cm X 4cm. Adjust these sizes accordingly if you are making canapés instead.

3.      Make the rectangle into a cylinder shape on top of one of the discs. Pinch the 2 pieces of pastry together around the base.

4.      Fill the cylinder with the mince mixture. Place another disc on top, and pinch together to seal.

5.      Brush the pie tops with beaten egg, then put a few holes in the top using a skewer. Bake at 200⁰C for 20 minutes. Delicious with Dijon mustard!


The next part of our journey took us to the quaint fishing ports of Sète and Port-Vendres. 

Port-Vendres

Afternoons were spent soaking up the sunshine, whilst enjoying fresh local fish in restaurants dotted along the water’s edge. This reminded me of my favourite French dish; Pissaladière. I love how the saltiness of the anchovies and olives is perfectly balanced with the sweetness of the onions. This dish is really easy to make, yet looks so impressive! The only part that requires patience is slow cooking the onions, but this is vital to give them their sticky sweetness. Try my recipe below:

Pissaladière
1.      Thinly slice 8 medium sized white onions and place in a saucepan with a generous splash of oil and 1 tbsp. sugar. Cook on a low heat for 45-60 minutes, stirring occasionally, until soft. Set aside to cool.

2.      Roll out some puff pastry into a shape of your choice. Score a border 2cm in from the edge to form the crust. Spread the onions evenly over the base within the border.

3.      Arrange some anchovies in a traditional grid pattern over the onions. Then slice a handful of pitted black olives in half. You can either add these to the topping now, or when the tart is cooked, depending on personal preference.

4.      Cook in the oven at 200⁰C for 20-25 minutes, and enjoy!


Pyrénées-Orientales
Finally, our travels took us through the vineyards of the dramatic Pyrénées-Orientales. We were spoilt for choice on where to stop for ‘dégustation de vins’! Tasting all the beautifully-bodied wines of the region left me inspired to cook another French favourite; Coq au Vin. This dish brings back fond memories of having it as a child, since it is a favourite in the family thanks to my grandad’s love of French cooking. The trick is to be generous with the red wine! Try my recipe below and enjoy this warming one-pot wonder as the nights draw in:


Coq au Vin
 
1.      Add a splash of oil to a casserole dish and brown off the chicken thighs (2 thighs per person). Don’t be tempted to skip this stage since it locks in the chicken’s juices, keeping the meat succulent and preventing the sauce from becoming oily later on. Set the thighs aside.

2.      Pop a couple of handfuls of baby button mushrooms into the pan and cook for a few minutes until golden. Set aside with the chicken.

3.      Turn the heat down and sweat a couple of chopped onions and a diced carrot for 10 minutes, until soft. Add a couple of chopped garlic cloves and cook for a further minute.

4.      Now to make the sauce. Add 2 heaped tbsp. plain flour to the vegetables and stir to combine. Now estimate how much sauce you will need to cover your chicken. You will need 2 parts red wine to 1 part chicken stock. First slowly add the red wine, constantly stirring to thicken the sauce. Then add the chicken stock and stir to make a delicious sauce.

5.      Finally pop in the chicken, mushrooms and a bouquet garni, then season with salt and pepper.

6.      Cook for 1 hour at 180⁰C. Serve with a crusty baguette to soak up all the tasty sauce.

 
So, crack open a bottle of France’s finest and have a go at some of these traditional recipes. Oh, and don’t forget to save some of the wine for the cooking, Bon appétit!

À bientôt for my next post!

Wednesday, 24 September 2014

Turning Japanese: Sushi Style!

Ever since my travels to Tokyo, I have been obsessed with Japanese food! With memories of tucking into the freshest sashimi breakfast at Tsukiji market, and sampling exotic sushi whilst overlooking the Sumida River, I was really keen to try making my own.

Does the idea of raw fish make you squirm? Then why not try using cooked or smoked fish, cooked meat or even making vegetarian sushi? I love using smoked salmon and cucumber, smoked mackerel with wasabi horseradish and pork with spring onion. Part of the fun of making your own is having the freedom to use ingredients you like and trying out new combinations each time.

Making sushi is so much fun! Perfect for a dinner party with a difference – you can make it all beforehand, or prepare a selection of fillings and help guests to roll their own with whatever they choose! It’s always a laugh attempting (and failing!) to use chopsticks too, making it sociable and entertaining. How about making it during a girls-night in for a healthy treat, or using it to impress on date-night?
I bought lots of crockery and condiments for sushi whilst in Japan. However, a quick hunt down the international food isle of the supermarket showed that it’s easy to get everything you want here too. You’ll need a sushi rolling mat, seaweed sheets (nori), special sushi rice (it goes nice and sticky to prevent the sushi from falling apart), and whatever fillings you fancy.
Here’s how to make Maki Rolls:
 
1.      Cook the rice according to the instructions and prepare your fillings. Cut any fillings into long strips if possible so you can lay them neatly along the entire length of the roll.
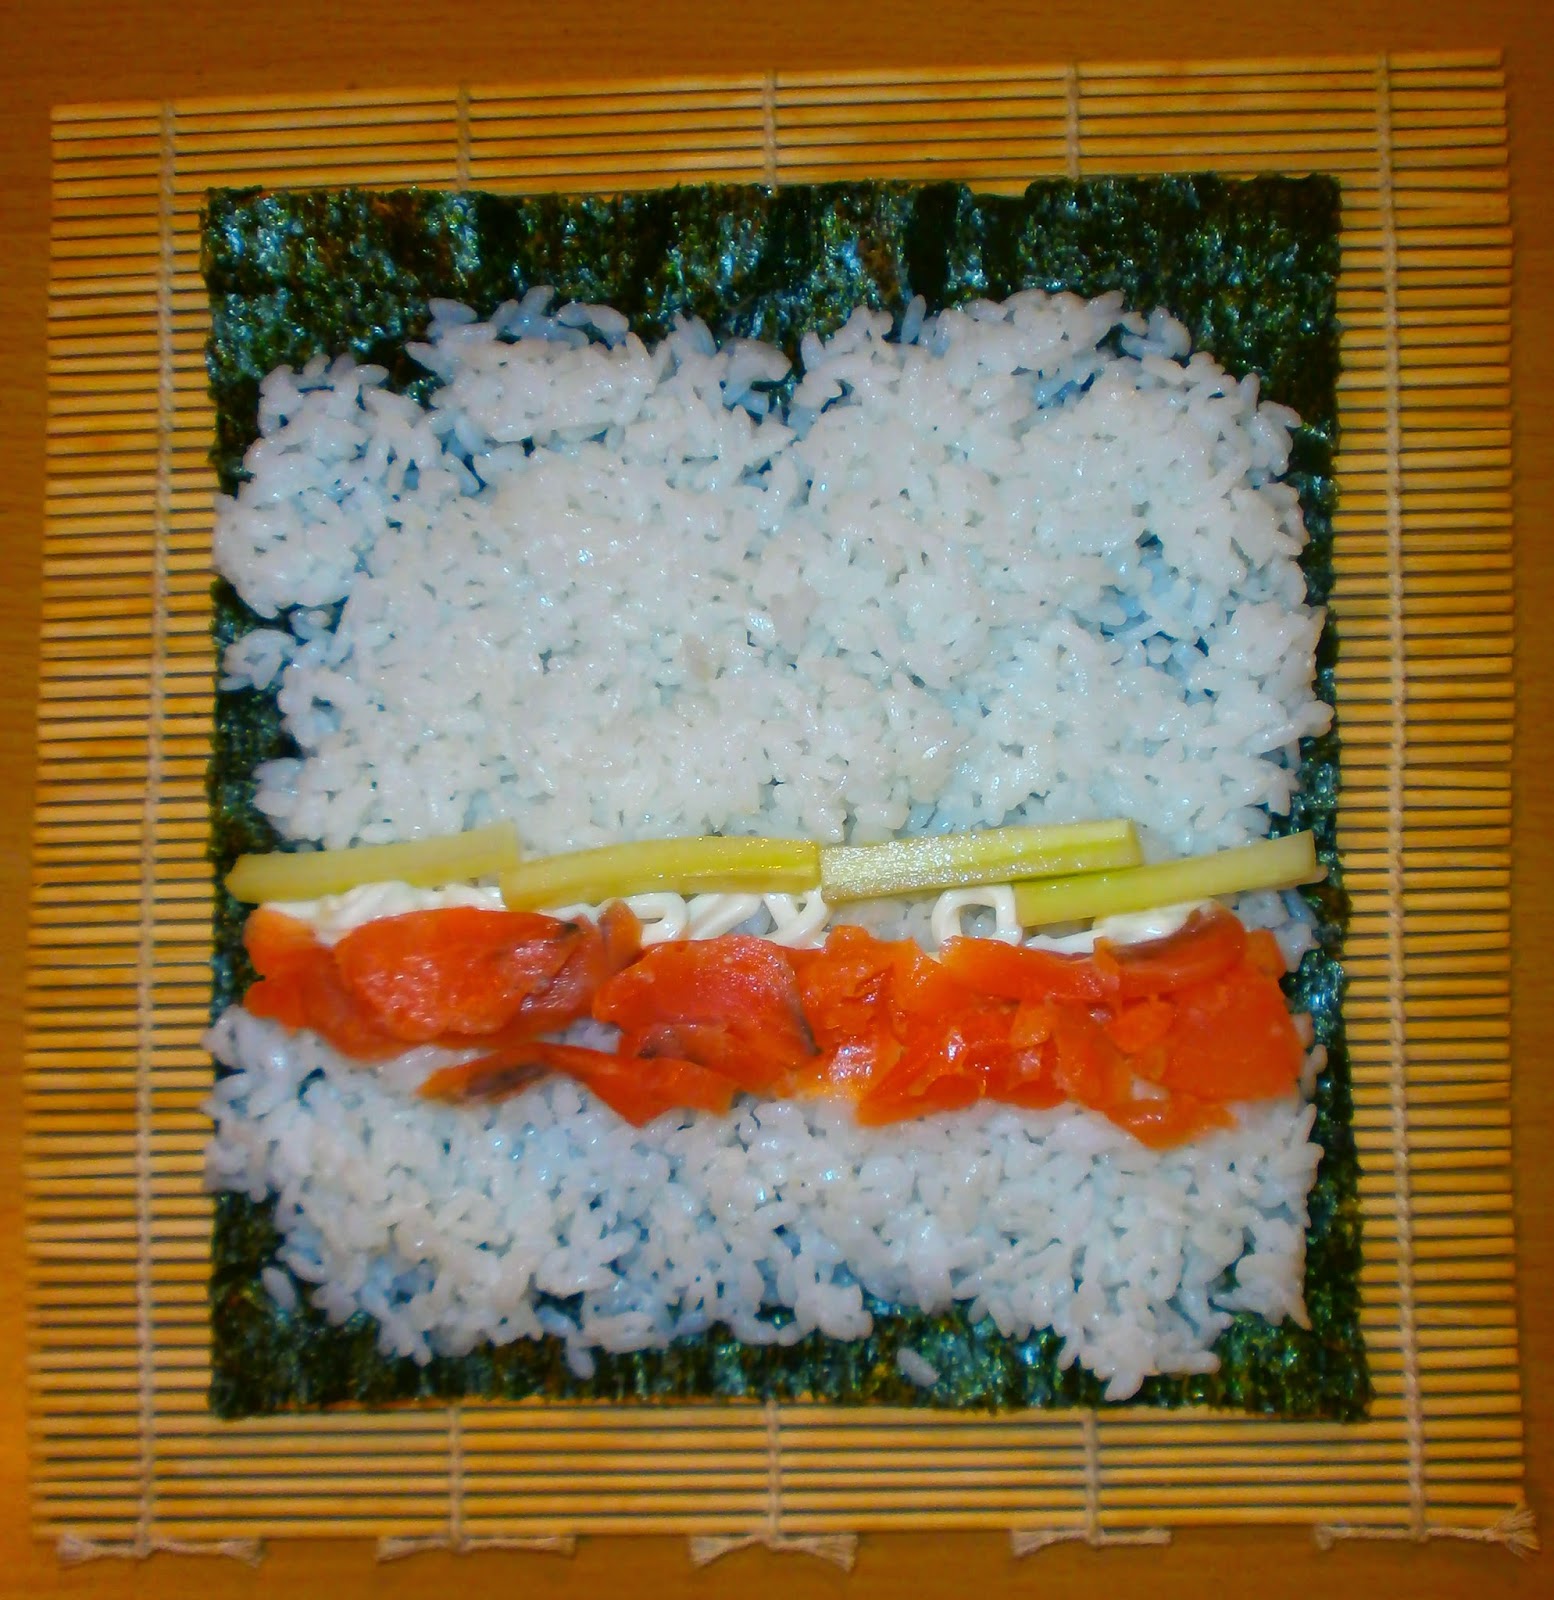
2.      Lay a nori smooth side down on a sushi rolling mat. Spread some rice evenly over the nori, except for 1 inch along the top. Use wet fingers to gently spread the rice, but don’t squash it or the roll won’t stick together. Place your fillings in a line along the lower 1/3. Each filling should be in its own line.
3.      Now the fun part! Dry your hands and, using the edge of the rolling mat closest to you, roll away from you to cover the filling with the nori. Keep rolling away from you, ensuring it is rolled tightly.
 
4.      Now use a sharp knife dipped in boiling water to cut the sushi into several pieces. Clean the knife in the water after cutting each piece, to ensure it cuts neatly and doesn’t disturb the filling inside.


And there you have it! Use lots of different coloured fillings to really ‘up’ the visual; peppers are great for this.  To eat, dip the sushi in soy sauce, followed by a touch of wasabi if you’re feeling brave! Cleanse the palate between pieces with some pickled ginger. I also served mine with some noodles, gyoza (little steamed pasties) and tempura whitebait to add variety.
Tempura Whitebait
 
Try this easy recipe for a Noodle Sauce that’s bursting with flavour:

1.      Chop some runner beans into bite-sized chunks. Cut the kernels off a sweetcorn cob. Boil or steam the vegetables until cooked. Pop the noodles separately onto the hob too.

2.      Whilst that’s cooking, make the sauce. Very finely chop half a red onion, half a red chilli and a bunch of fresh coriander (using a food processor to do this can save time). Add 2 tbsp. soy sauce, 1 tsp. sesame oil, 2 tbsp. olive oil and the juice of 1 lime, then stir to combine. Season with black pepper. Adjust these quantities to your own taste.

3.      Once cooked, drain the noodles and vegetables and mix together with the sauce for a tasty dish! Serve in small bowls alongside the sushi. Or, whip up this noodle dish with some bite-sized pork pieces for a quick, ‘no hassle’ mid-week meal.

So, have a go at making your own sushi for a fun, impressive meal that is healthy too. And good luck with the chopsticks!

I’m jetting off to France now for a holiday, so look out for my next French-inspired post in a fortnight!

Tuesday, 16 September 2014

Fruits of the Fall: 'Tis the Season to Get Figgy...

The month of September brings us lots of exciting seasonal fruits, so here are some juicy recipes starring a few of the best. Don’t forget that fruits in season are at their tastiest, less expensive, help to support your local economy and cut down on air-miles needed to transport your food. Try them before they’re gone for winter!

First up is my favourite, figs! With availability limited to only a few months of the year, they feel like such a treat when they arrive. Don’t know what to do with them? Aside from their fantastic flavour, what I love most about figs is their versatility. There aren’t many foods that are at home as a starter, within a main course or as a dessert (not to mention the cheese board!).

I was lucky enough to pick some from a friend’s fig tree. With guests coming over for dinner, I decided to whip them up as this simple but delicious starter - Figs wrapped in Prosciutto Ham:

1.       Chop off the stalk at the top if hard, cut a cross shape no more than half way down the fruit, then squeeze the bottom with your fingers so it fans out like petals on a flower. This will reveal their vibrant colour and pattern inside, yum!

2.      Wrap a thin slice of prosciutto ham carefully around the fig. Loosely scrunch up a further small piece and stuff it gently into the centre of the fruit.

3.      Finally, drizzle with honey before popping them in the oven at 180⁰C for 10 minutes until the ham becomes crispy. The figs I had were so ripe and sweet, that I actually skipped the honey.

4.      Serve them on a bed of mild-tasting leaves, dressed with a sweet balsamic glaze, for a ridiculously quick and easy starter that looks so impressive! These are also great served on a cheeseboard, as a quirky alternative to grapes.

For a different starter, this time suitable for vegetarians, try my Fig Boats:

1.      Slice the figs in half lengthways. Shell out the flesh, being careful not to make a hole in the skin. Keep the skins to one side.

2.      Chop the fig flesh into small pieces, and combine with some crème fraiche, crumbled stilton and crushed walnuts. Season with a pinch of salt and pepper.

3.      Fill the fig skins with the mixture. Bake in the oven for 5-10 minutes at 180⁰C until warmed through. Delicious!

Next up is the blackberry. I can’t step outside at the moment without seeing someone picking them off the hedgerows! After filling a basket load myself, and with apples from the orchard overflowing in my fruit bowl, I decided to put them to use with a Blackberry and Apple Crumble. I hate fussing around with desserts, but the only time-consuming part here is prepping the apples (not so laborious when ‘multi-tasking’ with the latest episode of Hollyoaks). The rest is easy:
Blackberry and Apple Mixture

1.      Peel and core the apples before chopping into small chunks.

2.      Pop them in a pan with half a cup of water and some granulated sugar (approx. 50g per dozen apples). Cook on a medium heat, stirring occasionally, until the apples soften and the edges start to go mushy.

3.      Whilst they’re cooking, make your crumble topping. Mix together 150g plain flour, 50g granulated sugar and 75g cubed salted butter until it resembles fine breadcrumbs.

4.      Take the apples off the heat and gently stir in as many blackberries as you like. Place the fruit mixture in a baking dish, then top evenly with the crumble.

5.      Cook for 25-30 minutes at 180⁰C until the fruit juices are bubbling around the edge. Perfect served with vanilla ice cream.

This fruit mixture can also be used to make a Fruit Tart instead. Simply line a greased tart dish with some shortcrust pastry (Tight for time? Cheat and buy ready rolled…shhh). Fill with the fruit mixture, after letting it cool. Thinly slice a few apples and arrange to make a pretty pattern on top. Brush with some melted butter, sprinkle with sugar and bake for 45 minutes at 180⁰C. Et voila, another stylish dish with little effort.

And there you have it, hedgerow heaven! Try your hand at these easy recipes using seasonal fruits, or make up some of your own.

Look out for my oriental inspired post next week!

Friday, 12 September 2014

Claws 'o' clock: Lobster dinner party

I kicked off my recent move up to North Wales with a lobster dinner party on the banks of the Menai Strait! Inspired by a seafood festival in the area, where I was surrounded by an abundance of the freshest seafood, caught around Anglesey’s coast (heaven!), I decided to celebrate the local delights.

What I love most about seafood is how fun and sociable it is to eat. Table manners go out the window, everyone gets their fingers messy and there is never a scrap left! Cooking seafood may seem daunting. But hopefully I will show you how fuss-free it can be!

Lobsters can be expensive, but are a fantastic treat. If you’d prefer something under-budget, I’ve also shown how to cook mussels which are cheaper. Another trick is to buy whatever fish in season, which is not only less expensive, but also helps to sustain stocks and tastes great too.

Lobsters are so full of delicious flavour and meaty texture that I like to keep them simple. Cooking times depend on the size (ask your fishmonger or weigh and check on the internet) and, if fresh, turn from dark blue to bright red once cooked. Simply bring a large pot of water to boiling and place the lobster in the pot. Once cooked, remove and hang the lobster over the sink for a couple of minutes to drain the water from its joints. Then cut it vertically down the centre of its back, from head to tail, to split it in half. This will need a very sharp and sturdy knife, and a good pair of muscles (cue my fellow sea-food enthusiast boyfriend!) Twist off the claws, and crack them with a hammer so people can open them more easily. I served mine dressed only with some cracked black pepper and fresh parsley, providing a garlic butter (recipe below) as an accompaniment to drizzle over as desired. An alternative could be to squeeze over some lemon juice for a citrus zing.

I also cooked some mussels with a sweet onion, garlic and white wine sauce (recipe below). A simple side salad of leaves, cucumber and sweet cherry tomatoes from the garden, some buttered new potatoes dressed with chopped fresh mint, and a crusty baguette to mop up the mussel sauce made the perfect feast. The best thing with this type of meal is that it can all be cooked in advance before your guests arrive and then served cold.
 
Armed with shell crackers, lobster picks and plenty of napkins, I encouraged everyone to get stuck in. And as predicted, nothing was left by the end of the evening!

So roll up your sleeves, check out my easy recipes below, get messy and give it a try!

Garlic butter:
Simply melt a slab of salted butter in a small saucepan with crushed garlic clove(s) and some chopped parsley. Cook on a low/medium heat for 5 minutes to gently soften the garlic until it turns golden, being careful not to let it burn. Season to taste with black cracked pepper. How much garlic you add is down to your individual taste. Remember, a little drizzle goes a long way.

Mussels in a white wine sauce:

Scrub all the shells under cold water to remove sand, seaweed and barnacles. Discard any that are already open and don’t close when handled.

Place a chopped white onion into the cooking pot with a tablespoon of oil and a splash of wine. Gently sweat the onions for approx. 5 minutes until they start to soften. Add a finely chopped garlic clove and cook for a further minute. Then add a small glass of white wine into the pot, a handful of parsley and the mussels. Bring to the boil and then turn down to a simmer. Stir a couple of times during cooking. The shells will start to open after approx. 4-5 minutes, indicating that the mussels are cooked. The mussel should be completely heated through but still soft and fleshy. If they are overcooked, they become hard and rubbery, not ideal! Discard any that don’t open. Serve with all the yummy sauce and a further sprinkling of fresh parsley.

Quick note: Know where your fish comes from. It is important to ensure the seafood you buy is being sourced responsibly: complying with regulations and supporting sustainability. Your local fishmonger should be happy to answer any questions about how their stock is sourced. They can also be very helpful in explaining how to prepare fish correctly (even doing all the fiddly bits for you if you prefer) and giving great tips on how to cook them.

Look out for my next post early next week!